How to Build and Install a Sliding Barn Door
By: ROS Team
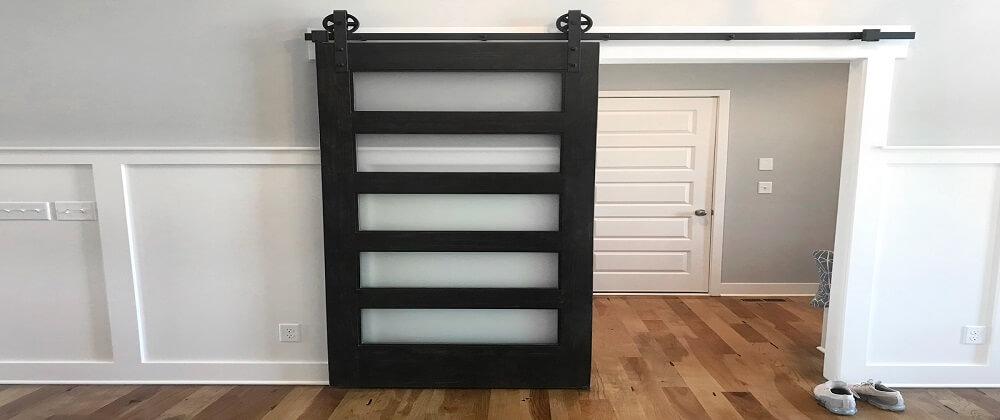
Installing a sliding barn door is an easy DIY project that you can do in just a day! In this guide, we’ll show you how to build and install a sliding barn door.
We’ll walk you through the process of planning and measuring your space, choosing your door hardware, laying out the parts of your frame, gluing and routing boards for the frame (and pocket-screwing them together), cutting face frame pieces to size—and more! By the end of this guide, you’ll know everything you need to take on your own DIY project.
Plan And Measure The Space
Before you begin, it’s important to plan and measure the space. You need to make sure that your door will fit in the space and also estimate how much lumber you’ll need for your project.
Measure the area where your sliding barn door will be installed. This will help determine which size track and rail system is best for your application, as well as help determine whether or not there is enough room for a track at all (if installed into drywall).
If possible, take measurements from both sides of where you want to install so that they’re symmetrical on either side of the center – this ensures that everything lines up correctly when finished!
Choose Your Barn Door Hardware
When choosing a set of barn door hardware, there are a couple of things to keep in mind. First, check that the hardware has all of the necessary parts and tools that you need to install it. Most importantly, make sure that the rails are compatible with your door height.
Second, consider what kind of look you want for your barn door – the shape and material can affect how easily it slides open and closed as well as its appearance overall.
Finally, make sure that the handles are easy-to-use even if they aren’t located directly above each other so people who aren’t used to using sliding doors can still operate them without difficulty.

Layout And Cut Your Lumber
Measure and mark the lumber. Use a tape measure to measure the width and length of your door opening, then transfer these dimensions to your lumber with a pencil. Cut out all four pieces of 1x4s using a circular saw or table saw (if you have one).
Next, make 45-degree cuts on each end of all four pieces so they fit snugly against each other when assembled into an L shape along one side of your door opening.
Glue And Rout Boards For The Frame
To build the frame, you’ll need to glue and route several boards in your chosen widths. For this project, we recommend using 1x3s (3/4″ x 1″) and 1x6s (3/4″ x 5-1/2″).
The first step is to make sure all of your boards are cut to length; if you don’t have a table saw or other tools that can do it accurately – or even if you do – we recommend using a professional lumber yard with an experienced staff member who can help with that task.
Afterward, apply wood glue along both edges of each board before clamping them together using bar clamps or C-clamps (make sure they’re tight!).
Then use an orbital sander equipped with 60 grit sandpaper to smooth out any rough spots where the clamps were applied; finally, finish up by routing around each joint with a router bit sized appropriately for its width (in our case, 2″).
Install The Face Frame To The Jambs
You are now ready to install the face frame to the jambs. Glue and nail or screw it into place. Make sure that all joints are square, level, and plumb (straight up and down).

Frame Door Panels And Set Them In Place With Pocket Screws
To install the door panels, use pocket screws to attach them to the frame. You can use a jig or clamp to hold the panel in place while you’re screwing it in.
Drill holes for your pocket screws before setting up your jig or clamp, then position the panel against the jig and drill into it with a drill bit that is slightly smaller than the screw head.
Attach The Cleats To Mount Hinges
When it comes to mounting the hinges, you’ll need to use a drill and screwdriver to install screws. Make sure you’re using the right length of screw for each cleat so that it can hold up your sliding barn door hardware.
- Measure out where on each side of your opening you’d like your hinges mounted (or how far apart they should be).
- Drill pilot holes with a drill bit just smaller than whatever diameter screws will be going through them (for example, if you’re using 3/4″ long wood screws, then measure out 1/8″ from each end). If possible, try not to make these pilot holes any closer than 1/2″. This will keep them from splitting when installing larger fasteners later on!
- Use an electric screwdriver with an extension socket adapter so that nothing gets in the way during the installation process.

Which Tools and Materials are Used to Build and Install a Sliding Barn Door?
The tools and materials used to build and install a sliding barn door are:
- Hand saw
- Hammer
- Drill (with drill bit)
- Wood screws
- Nails
- Tape measure
- Bar clamps
- Straight edge
How Hard is it to Install a Sliding Barn Door?
It’s not hard to install a sliding barn door. You just need to know how to do it and have the right tools. The hardest part of installing a sliding barn door is figuring out how to measure your openings and how much material you’ll need. Once you’ve done that, installation is easy!
Final Words
And that’s it! You now have a beautiful new sliding barn door. When you’re ready, you can install it on your own with these instructions.


